Search

Tampilkan postingan dengan label Tips. Tampilkan semua postingan

ATM ON THE WORLD TECHNOLOGY NETWORK


This tutorial provides the basic introduction to atm network technology, packet switching, cell base, telecommmunication technology, high speed bandwidth usage in this technology. ATM (Asynchronous Transfer Mode) is a high speed network technology that has become the standardized solution for the telecommunication industry, teleconferencing, videoconferencing, telemedicine, HDTV, distance learning and where high speed data transfer is required.


ATM technology integrates voice, data and video at the same time. ATM uses fixed size packets called cells of 55 bytes in length. ATM network is a high speed circuit switched network that is capable of transferring one million signals using ATM protocol. ATM is a connection oriented technology in which logical connections are established for the data communication. ATM is implemented in the WAN and telecommunication sectors. Small data cells are used for communication and ATM is designed for high speed and high traffic networks. ATM cells allow voice, data and video transfer at the same time. ATM operates on the data link layer of the OSI model and it uses UTP/STP, fiber optic or air as a communication medium.

ATM CELL BASE
It is a small unit of 55 bytes fixed length and it contains the users and signaling information in it. It has a header with very limited functionality to reduce the internal buffer and to provide the high speed transfer. ATM cell identify the cells that belongs to the same virtual channels and perform easy routing.

ATM SWITCHING
Various switching technologies have been developed in the past to provide the high speed data transfer and secure communication. ATM switching technology provides high speed data transfer due to the connection oriented technology. ATM switching technology uses the predefined routing table so guarantees the fast data communication.
ATM DEVICES
ATM basically uses two types of devices such as ATM switch and end systems. The function of the switch is to handle the transmission of the cells throughout the network. Switches accept the incoming cells from the ATM end station or another ATM switch. On the other hand, ATM end systems contain the ATM adaptors.
ATM CONNECTIONS
ATM supports two types of connections point to point and point to multi point connections. In the point to point connections, two end systems are connected bi directionally or uni directionally. The point to multi point system connects one source to the number of destinations in uni directional. The source sends the information and switch replicates it to the destinations. Unidirectional network connects two switches. A typical ATM network consists of a set of the switches interconnected by point to point links. Switch support two types of interfaces user network and network node interface. Asynchronous transfer mode technology is designed for the reliability, performance, utilization and QOS and it creates fixed channels and routes when data travels between two points. There are four types of the choice when purchasing a connection.
Constant Bit Rate: It specifies fixed size rate and data is transferred in a steady form. Variable bit rate.Variable Bit Rate: It provides specified throughput and it is best for videoconferencing. Available bit rate. It provides guaranteed minimum capacity but high rate is also possible when the network is free. 
Unspecified bit rate. It does not provide any fixed throughput level and it is best for the file transfer where delay can occurred.


ATM ADVANTAGES
It provides fixed bandwidth and simple routing is possible due to the connection oriented technology. High bandwidth utilization can be possible so it is the best solution for the telecommunication sector, videoconferencing and QOS. There are some of the disadvantages of this technology such as high cost, cell loss due to the high congestion in the network.

Common Errors & Symptoms of damage to the hard drive

The following are the common symptoms are problems that are associated with the hard disk failure.

  • Missing Power or data cable.

  • Incorrect BIOS configuration.

  • Incorrect Hardware configurations.

  • Devices Conflict.

  • Data cable is not connected.

  • Drive not powered on.

  • Port disabled.

  • Power supply might no be connected to the hard disk.

  • Missing operating system and hard drive boot failure message appear.

  • Disk out of space message appears.

  • No boot record, no disk found or invalid disk message appear, which indicates that the system boot files are not located on the root directory.

  • Hard disk controller failure message appear.

  • Display is present on the screen and front panel lights are also visible but there is not boot up.

Solutions:
While booting up the computer observe the BIOS’s hard disk configurations and information. Make sure that the system BIOS is displaying the exact information of the installed hard disk and there is no devices conflicts. Check the master/slave jumper settings and if you have attached more than one device to the same interface cable then make sure that all the devices are of the same type. If you cannot access the hard drive even its configurations and BIOS settings are correct then the problem must be in the components that are associated with the hard disk.  These components include drive, signal cable and hard disk controller.
For troubleshooting the cables related errors, unplug all the cables from the hard disk and plug them back.  For configurations related errors, check the system BIOS and make sure that it’s displaying the exact information and settings of the hard disk. 
Any kind of noise indicates the mechanical problems, which may be associated with the hard disk plates or any other components.  Replace the hard disk with new one.
No boot record found, disk failure, invalid disk and “NTLDR missing” errors indicates that either the operating system is not installed on the root directory or it has been corrupted.  Repair the operating system with the recovery disk or install new operating system.
To troubleshoot the surface errors of the hard disk run the following two commands one by one at the command prompt and press enter.
Scandisk
CHKDSK
These commands will check the hard disk for possible errors and troubleshoot them.
Troubleshooting USB Device
  • Make sure that you have the latest software installed on your computer because if the software doesn’t have the latest components then the devices can cause problems. 

  • Visit the manufacturer’s website to see any latest drivers for the device.

  • Unplug the faulty USB device and plug it back.

  • Unplug all the USB devices from the computer such as USB drive, USB keyword, USB mouse etc and then plug them back one by one.

  • If it’s a new USB device then replace it with another and if it’s an old one then figure out the changes that you did just before the device stopped working.  Did you install any new hardware or software?

  • Check the USB device with all the USB ports of the computer and see if it works with any port or not?

  • Check the USB device with the other computer and see if it works fine with it

How Storage Device Problems on your computer?


Storage computer networking has become the important part of the overall IT infrastructure.  Before troubleshooting it is important to understand the storage infrastructure and technologies.  Data from the hard disks can be protected effectively by various methods such as mirroring, backup recovery and remote copy.  There are other advanced storage methods such as virtual storage technologies and network virtualization. 
An organization that has been existed for a couple a years may face many technological changes.  For an enterprise storage solution there is a huge number of technologies that provide required functionalities.
Computer hard disk is an important part of the PC.  In case of any errors in the hard disks computer stops working and operating system fails to load. Following are the most common symptoms of the hard disk failure.

Antivirus great for network security server


Norton Personal Firewall
The key features of the Norton personal firewall are the personal firewall, stealth technology Trojan horses blocking, automatic updating, and monitors and regulates all incoming and outgoing traffic to the internet.  One click administrative control allows limiting the access to the computer or the users on the network.  You can select that which user can connect to you.  It provides defense against the Trojan horses and the spyware.  History log provides access attempt information and the test mode shows how the firewall is providing protection against the hackers.
McAfee Personal Firewall Pro
McAfee Personal Firewall Pro blocks unwanted and unauthorized inbound and outbound internet traffic.  McAfee Personal Firewall Pro is integrated with McAfee virus scan, virus detection and removal.  McAfee Personal Firewall Pro safeguards your personal documents, financial data, photos and online communication by preventing and blocking the unauthorized access to your computer.  One click home network support allows you to configure multiple computers within your home network.  New advanced control features control internet application access.  Intelligent application handling denies outbound internet access to the malicious applications that transfers your personal data to the hackers.
Sygate Personal Firewall Pro
Sygate Personal Firewall Pro is a firewall intrusion defense system.  It protects your personal computer from the hackers and the intruders.  It makes your protected computers invisible to the outer world.  When your network has been compromised then every adjacent computer or network is at risk.  Sygate Personal Firewall Pro can stop the intruders from gaining access to your computer.  Sygate Personal Firewall Pro’s control panel allows you to control the running applications.
Norman Personal Firewall
Norman Personal Firewall protects your computer against the attacks from the internet.  The key features of this software are ports scanning, real time protection, active content control and parental control.
Panda Platinum Internet Security
Panda Platinum Internet Security 2008 protects your personal information and blocks the intruders and hackers.  With Panda Platinum Internet Security all your computer activities will be fully protected and you will be kept secure from the viruses, spyware, Trojan horses, intruders and the hackers.  Panda Platinum Internet Security is a complete security suite that includes firewall system, anti spy ware, anti phishing, anti rootkit, parental control and personal bi directional firewall.  Panda Platinum Internet Security also provides automatic backup system that protects your files from the accidental deletion.  It also allows the deep scanning of your computer with the TotalScan Pro.
Webroot Desktop Firewall
With the Webroot’s two way Desktop Firewall protection system keep your data in and the intruders and hackers out. Webroot Desktop Firewall protects your computer from the unauthorized access, worms, internet threats and the Trojans.  Webroot Desktop Firewall creates comprehensive internet activity logs.  Webroot Desktop Firewall easily allows you to share file and printer with the other computers in your network.  With Webroot Desktop Firewall you get the automatic security alerts when suspicious programs, applications or computers attempt to send information to or from your computer.

Setting Speedy Modem ADSL Sebagai Bridge Di OS LINUX

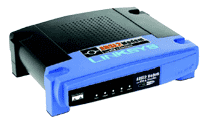
Telkomspeedy lauching pertama kali di Jember, kota di mana saya bekerja, sekitar bulan Juli 2006. Saat itu saya belum pernah merasakan internet dengan speedy, tahu-tahu diminta bos untuk membantu men-setup modem adsl di Kopegtel (Koperasi Pegawai Telkom) di jalan Kartini. Modemnya merek linksys, tipenya mungkin ADSL2MUE, pada link tersebut terdapat manual untuk konfigure modem tersebut untuk mode bridge (winxp).
Modem ADSL Linksys ADSL2MUE
Pertama, saya minta manualnya, kemudian baca2 sebentar dan akhirnya tahu bahwa modem adsl ini berfungsi sebagai router dan bisa dicolokkan langsung ke swicth/hub untuk melayani koneksi internet bagi semua komputer yang terhubung keswicth/hub, asal fungsi dhcp clientnya diaktifkan.
Berhubung cukup lama mainan iptables di mesin linux, saya coba lihat apakah ada fungsi firewall di modem tsb. Setelah login melalui web configuration, saya lihat banyak sekali fitur yang ditampilkan sampai saya bingung sendiri -)
Yang pertama saya baca-baca adalah seting koneksi untuk speedy, tidak ada yang saya mengerti di sini -? , kecuali login speedy dan ini dia fungsi bridge, jadi modemnya bisa berfungsi sebagai bridge mirip modem eksternal yang biasa dipakai untuk dial ke isp. Pokoknya diterima apa adanya dulu deh. Lantas saya lihat fungsi firewall, nah ini dia yang bisa saya otak-atik. Yang diinginkan pertama adalah mencegah icmp dan smtp keluar dari client karena virus brontok suka ping ke domain internet dan mencegah virus dari client kirim email. Selain itu juga saya batasi hanya beberapa ip client yang bisa konek internet. Setelah save dan reboot modem, ternyata hasilnya mengecewakan, beberapa client bisa konek dan ada yang tidak. Saya masih belum tahu salahnya dimana, lagian keisengan setup modem linksys tsb terbatas waktunya karena saya harus balik ke kantor dan lagipula saya tidak mau direpotkan apabila dapat keluhan dari pengguna. Jadi saya balikin deh seting modem tsb ke default.
Sejak saat itu saya terobsesi bagaimana membuat modem adsl bisa jalan sebagai bridge di mesin linux. Khusus modem linksys ADSL2MUE ini rupanya sudah ada driver bridge untuk mesin windows. Kesempatan itu akhirnya datang setelah kantor saya jadi berlangganan speedy, itu pun setelah saya provokasi agar pakai speedy daripada pakai telkomnet instan (tni) yang koneksinya tidak bisa dijamin, sudah konek tapi tidak bisa browsing internet, baru bisa browsing setelah beberapa kali konek -( . Yang datang ke kantor bawa modem speedy rupanya orang telkom yang dulu saya temui sewaktu di Kopegtel Kartini, karena sudah mengenal saya, dia memberikan saya modem adsl yang masih terbungkus agar disetup sendiri.
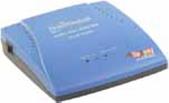
Sewaktu dibongkar, ternyata modemnya adalah DareGlobal model DB108-E. Padahal saya pingin dapat yang linksys , alasannya keren karena keluaran Cisco ) . 
Modem ADSL DareGlobal DB108-E
Saya baca sekilas di manualnya bahwa modem ini mempunyai ip default 192.168.1.1, akhirnya server linux yang biasa pakai modem eksternal untuk konek ke tni dikonfigurasikan untuk client modem tsb. Modem dikonekkan ke link adsl dan ke server linux pakai cross cable, terus dinyalakan. Waktu itu saya belum setup login speedy di modemnya, iseng-iseng nge-ping dns telkom, eh kok ternyata tembus, wah dapat koneksi speedy gratis nich :d .
Masa gratisnya cukup lama, dua minggu lebih. Selama itu saya belum sempat mencoba setup modemnya sebagai bridge, keasyikan download macam-macam, mumpung gratis. Akhirnya masa foya-foya lewat sudah sekarang waktunya bekerja. Berikut ini prosedur setup modem adsl DareGlobal untuk mode bridge:
  1. Login ke web configuration modem adsl.

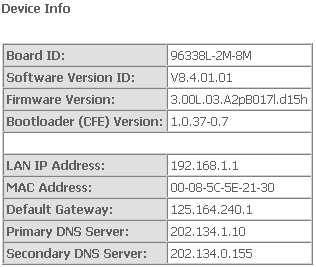
  2. Tampilan pertama kali adalah Device Info seperti gambar di bawah (ini saat mode router dan status konek ke internet):
    device info mode router

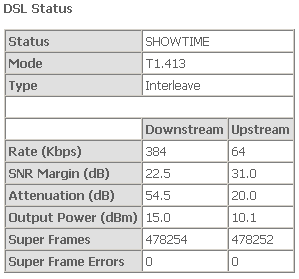
  3. Tampilan DSL Status seperti pada gambar di bawah:DSL Status Modem ADSL Speedy

  4. Klik WAN akan menampilkan default WAN Setup (mode router), untuk mengubah ke mode bridge, baris yang mengandung Protocol PPPoEdicawang lantas klik tombol Remove:
    Wan Setup Modem ADSL DareGlobal

  5. Lalu klik Add akan muncul isian untuk ATM PVC Configuration, isikan seperti contoh di bawah, kemudian klik Next.
    • VPI:[0-255] 0

    • VCI:[0-65535] 35


  6. Untuk tipe network protocol pilih Bridging dan untuk encapsulation mode pilih LLC/SNAP-BRIDGING, klik Next.

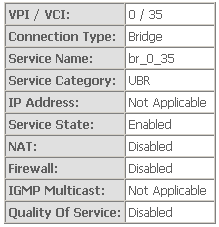
  7. Beri cawang pada Enable Bridge Service dan kasih nama br_0_35untuk Service Name, klik Next.

  8. Berikut WAN Setup – Summary seperti pada gambar di bawah, klikSave apabila konfigurasinya sudah benar dan reboot modem adsl-nya:
    Wan Setup Summary Modem ADSL DareGlobal

  9. Tampilan WAN Setup (mode bridge) yang baru akan seperti gambar di bawah:
    Wan Setup Modem ADSL DareGlobal (mode bridge)

  10. Klik Save dan Reboot modem.

Modem adsl telah selesai disetup sebagai bridge, sekarang kita akan membuat koneksi pppoe di linux. Untuk linux redhat 9, nama paketnya rp-pppoe-3.5-2.rpm, untuk slackware 10.2 rp-pppoe-3.6-i486-1.tgz, jika ingin install dari source silahkan download di RP-PPPoE | Roaring Penguin.
Mungkin ada yang bertanya bagaimana mengakses web configurationmodem apabila telah diset mode bridge ? Caranya mudah, untuk ini kita perlu komputer dengan OS windows, install driver yang dibutuhkan untuk koneksi ke modem melalui port usb, kemudian konfigur ip address windows dengan ip addres selain 192.168.1.1. Jadi meski modem tersebut sedang konek ke speedy dan user-user sedang browsing internet kita bisa monitor dsl statusnya.

Cara Konfigurasi Dasar Linksys WRT54G Sebagai Internet Server Gateway


Linksys WRT54G merupakan Broadband Router yang dilengkapi dengan wireless b/g. WRT54G dapat dijadikan sebagai server gateway untuk koneksi internet anda, umumnya yang berkonseksikan “broadband internet accses”. Untuk mengkonfigurasi router ini sangatlah mudah. Berikut langkah-langkahnya :

Pertama “Setting IP WAN & LAN” :
- Siapkan/nyalakan Router Linksys WRT54G anda.- Sambungkan kabel data (UTP Straight kabel) ke port LAN komputer/Laptop Anda.- Setting IP pada komputer/laptop anda menjadi DHCP agar lebih mudah.- cek ip, netmask dan gateway yang diterima komputer anda.- buka browser anda dan masukkan ip gateway komputer anda tadi, defaultnya http://192.168.1.1/ .- Nah, akan muncul form password untuk akses ke routernya, default user/pass : admin- Pada internet Connection Type nya silahkan dipilih : DHCP atau Static, ini tergantug ISP yang Anda gunakan.
- lalu masuk ke settingan Network Setup, Settingan LAN sesuai keinginan anda atau biarkan saja untuk default.
Jika Anda memilih DHCP disable maka anda harus memasukkan IP, Netmask, Gateway dan DNS secara manual untuk setiap klien.
- untuk Time Zonenya pilih GMT+7 untuk indonesia, yang laen terserah Anda.- lalu Save Setting.
- Nah sampai disini, Client yang menggunakan kabel sudah dapat terkoneksi ke internet.
Kedua “Settingan WIFI” :
- pilih Menu Wireless- wireless network mode sebaiknya dipilih Mixed agar support ke tipe wifi b dan g
- ganti SSID sesuai kemauan Anda.
Untuk SSID Sebaiknya menggunakan Huruf Kecil Semua, dan ganti spasi dengan garis bawah untuk mencegah, beberapa perangkat wifi penerima yang tidak support.
- wireless Channel silahkan dipilih default aja, kecuali ditempat anda terdapat wifi/hotspot lainNah, untuk hal ini bisa anda ganti dengan channel yang belum terpakai.- lalu pilih Save Setting.
- Nah sampai disini, Client yang menggunakan kable & WIFI sudah dapat terkoneksi ke internet.
Untuk mengamankan koneksi WIFI anda, sebaiknya anda memasang security pada wifi anda.Tipe security anda bisa berupa WEP atau WPA. namun untuk lebih universal pilih saja WEP yang 64 bit. Cara konfigurasinya :- pilh Menu Wireless – Wireless Security.- pilih security mode = WEP- pilih default transmite key = 1- pilih WEP Encryption = 64 bits10 hex digits- masukkan passphrase dan klik generate, Maka akan tercipta 4 key untuk akses password wifi anda, silahkan gunakan Key 1, (karena anda memilih defaul transmitenya = 1).- lalu Save Setting
- Nah koneksi WIFI anda sekarang sudah Secure (dalam artian memiliki password dan terenkripsi).
Cukup itu saja konfigurasi dasarnya, Tidak terlalu sulit khan ????
Berikut beberapa Gambar Panduan konfigurasi diatas :


Kedepan akan saya tambahkan Konfigurasi lebih lanjut. Selamat Mencoba yah….

Menjaga Kesehatan Mata bagi Pengguna Komputer

Kesehatan-Mata-Pengguna KomputerBekerja atau berselancar ria di depan computer seringkali membuat kita tak mengenal waktu. Kegiatan itu bisa berlangsung berjam-jam sampai membuat kita lupa makan, minum atau bahkan tidur. Kalau sudah begitu jangan heran kalau akan datang banyak keluhan dari tubuh kamu, terutama dari mata kamu. Bagaimana tidak? Saraf-saraf di mata dipaksa untuk bekerja tanpa istirahat memandangi apa yang ada di monitor terus-menerus tanpa henti. Tentu saja hal itu tidak boleh terjadi, tetapi jika pekerjaan atau kegiatan kamu mengharuskan kamu untuk berlama-lama di depan computer, maka ada beberapa tips dan trik yang bisa kamu lakukan sehingga mata kamu tetap sehat dan pekerjaan kamu pun selesai.

Berikut tips yang bisa dilakukan oleh para pengguna computer dalam menjaga kesehatan mata mereka:

  • Istirahatlah secara teratur agar mata kamu juga bisa beristirahat. Caranya kamu bisa mengalihkan pandangan kamu dari monitor computer atau kamu juga bisa beranjak dari depan computer untuk berjalan-jalan sebentar atau sekedar mengamil camilan.
  • Idealnya, posisikan monitor sedemikian rupa sehingga jendela dan atau smer cahaya berada disamping monitornya.
  • Pastikan bahwa jarak mata kamu ke monitor adalah antara 33 cm sampai dengan 59 cm, dan pastikan juga bahwa posisi pusat (titik bagian tengah) monitor adalah berada 10 cm – 15 cm di bawah pandangan horizontal mata kamu.
  • Selalu jaga kebersihan monitor kamu, baik itu dari debu ataupu dari sidik jari yang iasanya menempel di sana.
  • Jika monitor kamu merupakan model lama, maka sebaiknya ganti dengan model yang baru guna meminimalisasi pengaruh negative dari monitor terhadap mata kamu, seperti tingkat kesilauan yang tinggi ataupun besarnya radiasi yang dipancarkan. Atau kamu juga bisa menggunakan filter untuk mengurangi kesilauan monitor.
  • Jika memungkinkan, sebaiknya gunakan kaca mata diandingkan dengan menggunakan contact lens selama kamu berada di depan PC.
  • Pastikan kamu selalu mengkonsumsi makanan yang kaya akan vitamin A, C dan E yang membuat mata kamu selalu sehat, termasuk makanan seperti wortel, bayam, kacang almond, ikan salmon, dan sebagainya.
  • Monitor jenis LCD leih ramah terhadap kesehatan mata kamu dibandingkan dengan monitor jenis CRT.
  • Jika kamu menghabiskan waktu di depan computer untuk memasukkan banyak data ataupun membaca dokumen yang panjang, maka sebaiknya gunakanlah monitor yang besar karena objek yang kamu lihat juga akan lebih besar bukan? Dengan begitu ketegangan mata kamu akan semakin berkurang.
  • Gunakanlah kursi yang tepat agar posisi mata kamu terhadap monitor computer juga tepat (yaitu 10cm-15cm di bawah pandangan horizontal mata kamu).

Untuk membuat mata kamu tetap sehat selama berada di depan monitor computer ternyata dibutuhkan latihan-latihan khusus untuk mata yang berguna untuk mengurangi ketegangan pada saraf-saraf mata. Hal itu bisa disebut olahraga untuk mata, suatu kegiatan yang ringan tetapi berdampak besar bagi kesehatan mata kamu.

Blogger Template